DMVPN Lab 4 RIPv2 to OSPF transition
Previous Next
Download Lab: EVE-NG
Image needed: Cisco IOSv
Description:
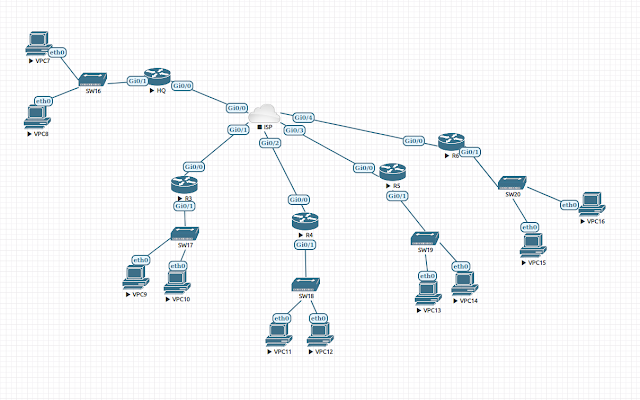
This DMVPN topology currently runs RIPv2 as its routing choice, the owner of this network wants the network to converge faster than it has now, he/she learned about OSPF protocol's better performance, you were asked to assist in this project. Successful completion of this lab will be requiring you to implement OSPF without loss of any transit data and any downtime. This lab is similar to the previous RIPv2-to-EIGRP transition lab. Lab details included within the .unl file.
Topology:
Task1: Implement OSPF on the HQ:
Step1: Enable OSPF process 10 on the HQ router first.
Step2: Adjust the administrative distance to higher than RIPv2 (HQ Router)
Step3: Advertise only DMVPN networks with OSPF network command and use area 0. (HQ Router)
Step4: Redistribute RIPv2 routes into OSPF, this will prevent from data loss when you will start removing RIPv2 from topology. (HQ Router)
Step5: Under Tunnel0 interface, configure OSPF network type point-to-multipoint and change OSPF priority to 200. (HQ Router)
Step6: Save configurations. (HQ Router)
Task2: Implement OSPF on spokes:
Task3: Remove RIPv2:Step2: Adjust the administrative distance to higher than RIPv2 (HQ Router)
Step3: Advertise only DMVPN networks with OSPF network command and use area 0. (HQ Router)
Step4: Redistribute RIPv2 routes into OSPF, this will prevent from data loss when you will start removing RIPv2 from topology. (HQ Router)
Step5: Under Tunnel0 interface, configure OSPF network type point-to-multipoint and change OSPF priority to 200. (HQ Router)
Step6: Save configurations. (HQ Router)
Task2: Implement OSPF on spokes:
Step1: Enable OSPF process 10 on the spoke routers.
Step2: Adjust the administrative distance to higher than RIPv2
Step3: Advertise only DMVPN networks with OSPF network command and use area 0.
Step4: Under the Tunnel0 interface, configure OSPF network type point-to-multipoint and change OSPF priority to 0.
Step5: Save configurations on all spokes routers.
Step6: Verify OSPF neighborship and database across the topology.
Step1: Disable RIP protocol on the spoke routers first.
Step2: Change OSPF distance back to default.
Step4: Verify routing table on the spoke routers, make sure that all necessary routes have been learned.
Step5: Remove RIP protocol on the HQ router.
Step6: Return AD back to default on the HQ router.
Step7: Verify the routing table on the HQ router.
Step8: Save all configurations.
Task4: Troubleshooting:
Command reference:
Configuration:
router ospf 10
distance ospf intra-area 125 external 125
network 192.168.3.0 0.0.0.255 area 0
network 10.0.0.0 0.0.0.255 area 0
redistribute rip subnets
interface Tunnel0
ip ospf priority 200
ip ospf network point-to-multipoint
Verification:
show ip ospf neighbor
show ip ospf database
show ip route rip
show ip route ospf
show ip interface brief
Step2: Change OSPF distance back to default.
Step4: Verify routing table on the spoke routers, make sure that all necessary routes have been learned.
Step5: Remove RIP protocol on the HQ router.
Step6: Return AD back to default on the HQ router.
Step7: Verify the routing table on the HQ router.
Step8: Save all configurations.
Task4: Troubleshooting:
The problem:
It appears that path traffic takes from one spoke LAN to another goes through HQ router when it supposed to be via another spoke router.
Step1: Verify the issue occurring on the network.
Step2: Determine the cause of the problem.
Step3: Configure routers in the topology in a way that will change the traffic path.
Step4: Verify your solution.
Command reference:
Configuration:
router ospf 10
distance ospf intra-area 125 external 125
network 192.168.3.0 0.0.0.255 area 0
network 10.0.0.0 0.0.0.255 area 0
redistribute rip subnets
interface Tunnel0
ip ospf priority 200
ip ospf network point-to-multipoint
Verification:
show ip ospf neighbor
show ip ospf database
show ip route rip
show ip route ospf
show ip interface brief

Comments
Post a Comment